Using dypt
Getting around
Master the dypt layout
Let's take a look at the dypt layout and how to navigate around. It's where you can create tasks, view your calendar and generally manage your tasks.
The dypt home screen
dypt is mobile and desktop friendly, this means its design adapts to the size of your screen. This allows you to use dypt on any device, from your phone to your tablet to your laptop. It also means you can use dypt on the go, at your desk or on the sofa.
Below are screenshots of the dypt home on mobile and desktop. You can see that the layout is similar, but the desktop version has more usable space and so more information can be shown.
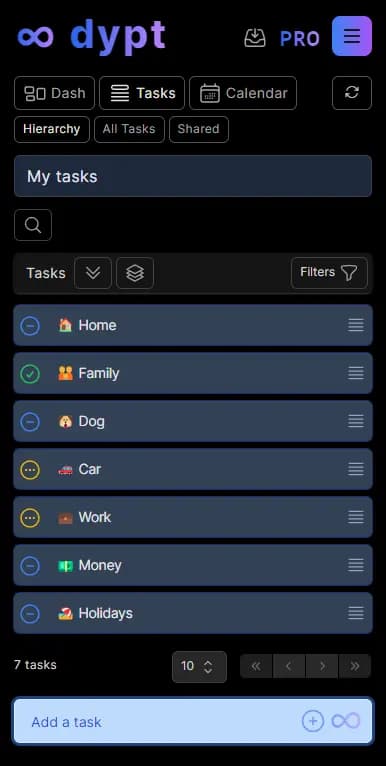
Mobile home
dypt on mobile is designed to be used with one hand. Great for quickly adding tasks and viewing your calendar on the go.
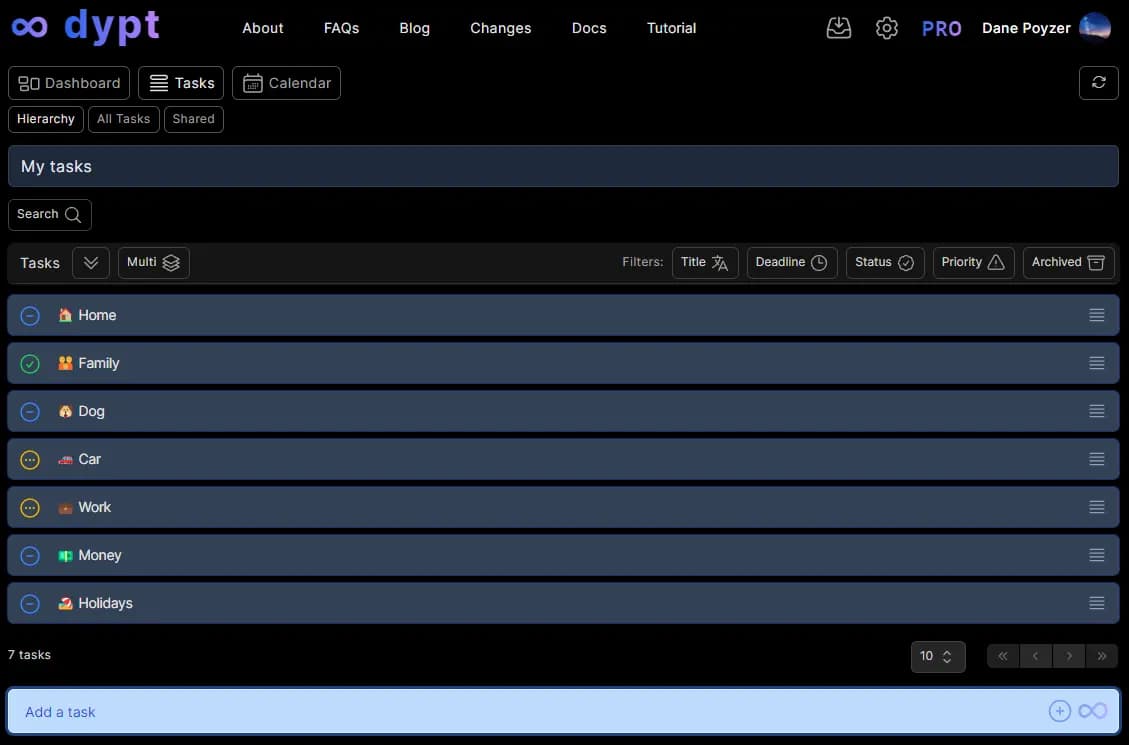
Desktop home
dypt on desktop is designed to be used with a mouse and keyboard. Great for navigating with speed and maximising your productivity.
Key pages
The dypt home is made up of a number of pages. Each page has a specific purpose. Here's a quick overview of each page.
Dashboard
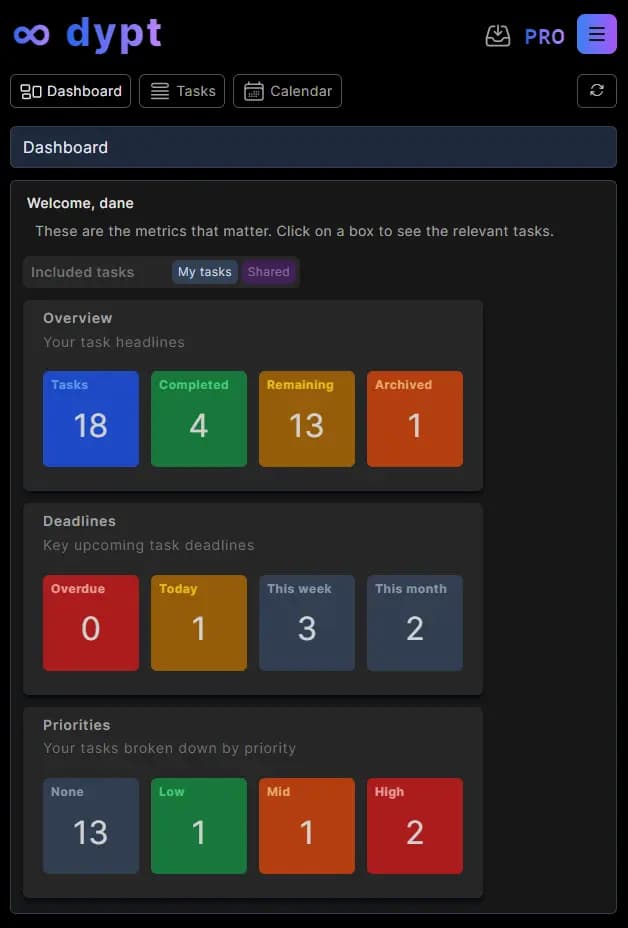
The dashboard shows you a summary of your tasks and their statuses and deadlines. It's a great way to get an overview of the important stuff at a glance.
You can click on each of the boxes to be taken to the tasks. For example, clicking on the 'Overdue' box will take you to the 'All tasks' page with the overdue filter applied.
You can also choose to include tasks that have been shared with you in the dashboard by clicking the purple 'Shared' button at the top of the dashboard. This allows you to see all of your tasks and tasks that have been shared with you in one place.
Tasks
Video overview
Visual learner? Check out the video on dypt's hierarchy
Your tasks in dypt are organised into a hierarchy; whereby any task can have subtasks. This allows you to break down large tasks into smaller, more manageable tasks.
It's entirely up to you how many levels of hierarchy you use, sometimes a task stands alone and doesn't need any subtasks. Other times you may want to break a task down into many subtasks, and then break those down into even more subtasks.
The tasks page has three sub pages:
- Hierarchy provides a visual representation of your tasks and their hierarchy. It's a great way to get an overview of your tasks and their relationships. Starting at the top 'home' level, it allows you to drill down into each task and its subtasks until you reach the end of the 'branch'.
- All tasks provides a flat list of your tasks, offering a comprehensive overview of their statuses. You can also use it to quickly find a task and view its details. It's most useful when you want to filter for a specific set of tasks. For example, you can filter for all tasks that are due today, or all tasks that are in progress.
- Shared provides a list of tasks that have been shared with you. It's most useful when you want to see all of the tasks that have been shared with you in one place.
Calendar
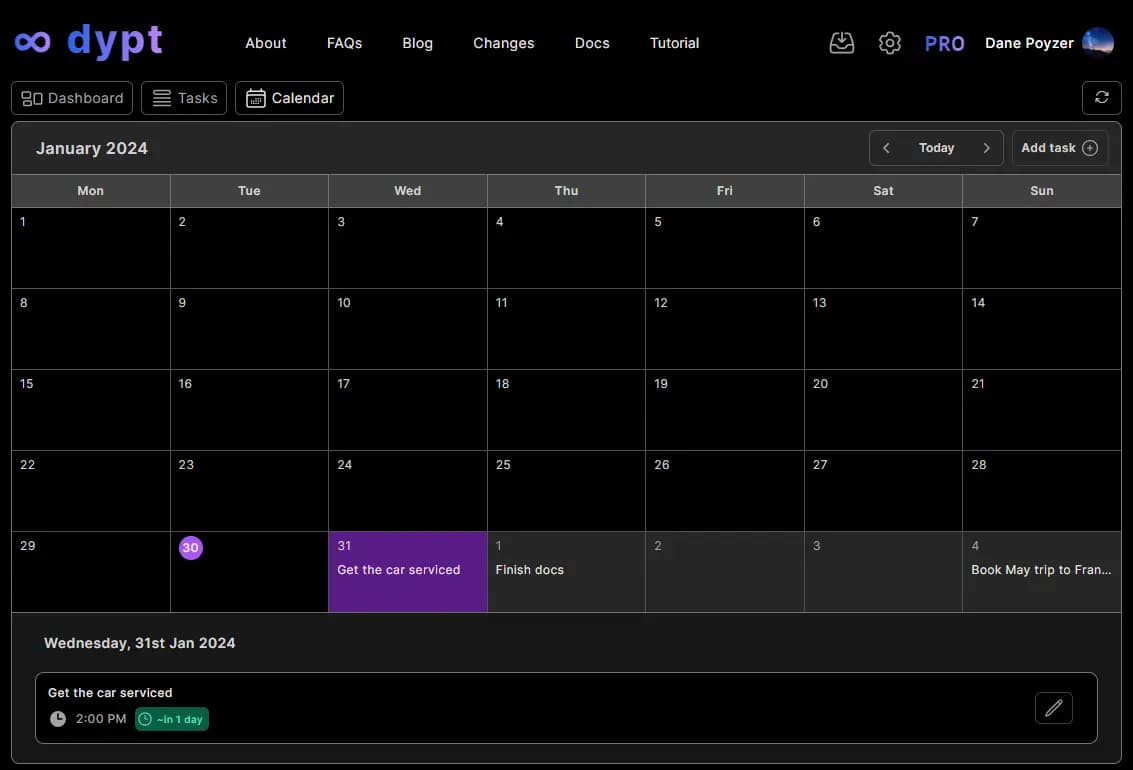
The calendar provides a visual representation of your tasks and their deadlines broken down into months.
It's most useful when you want to see what's due in the future. For example, you can see what's due today, next week or next month.
Select a day to view a breakdown of the tasks due on that day beneath the calendar. Select a task to be taken to that task's page.
You can also add a task to the calendar with a preselected deadline by selecting a day and then pressing the 'Add task' button.
Layout of the task pages
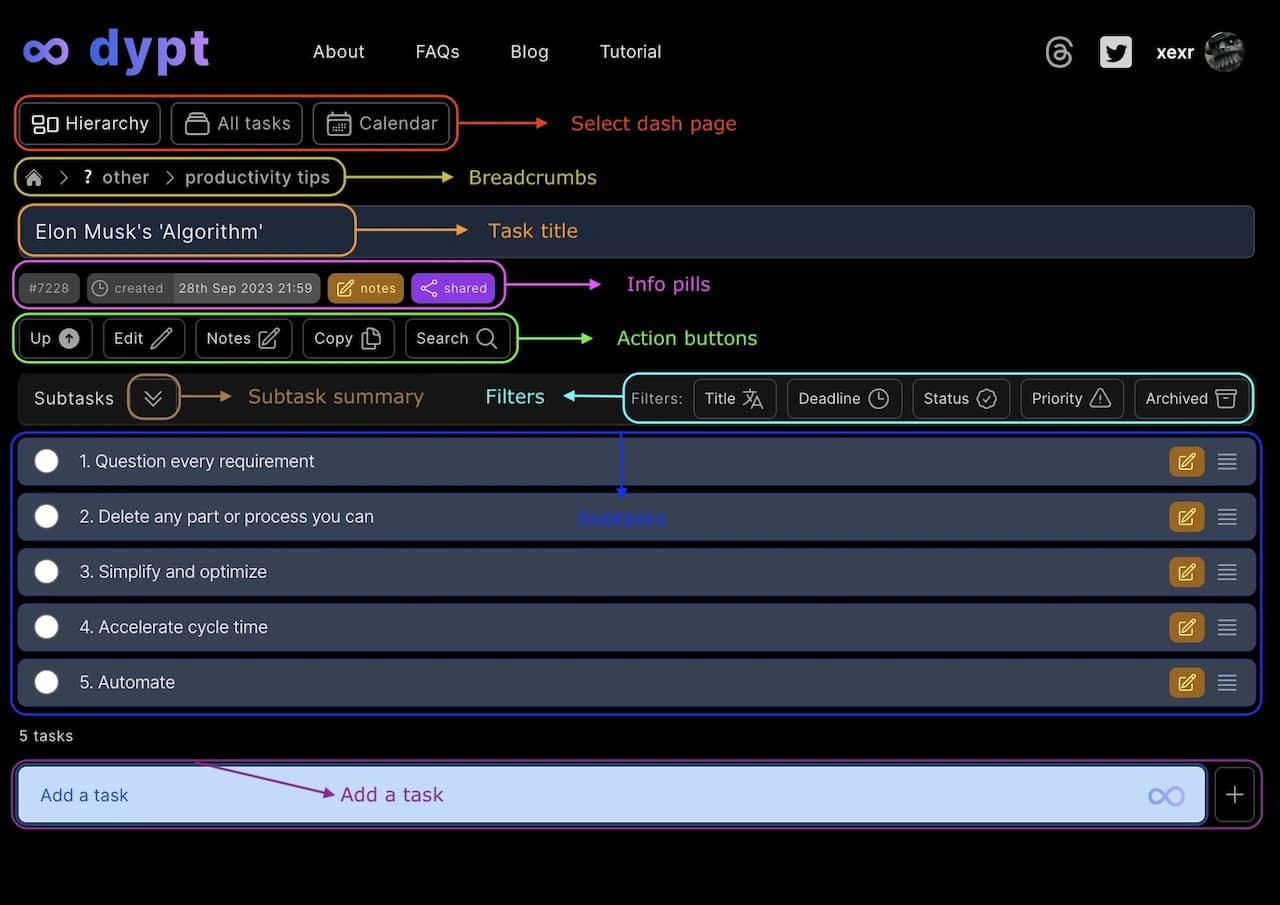
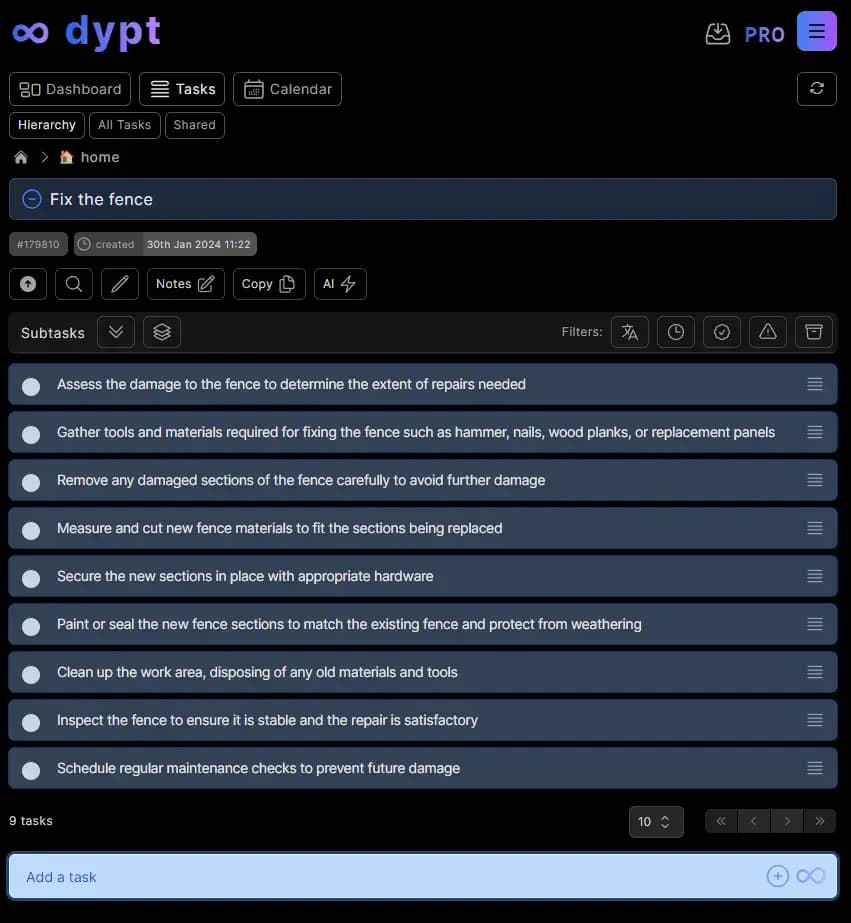
Each of the task pages are similar in design, they use a table format with each row representing a task.
When you click on a task, you'll be taken to that task's page. This page shows you the details of the task itself as well as a breakdown of that task's subtasks and their statuses.
Breadcrumbs
The top of the page shows you the breadcrumbs of the task's hierarchy. This is a representation of the position of the task in the hierarchy. You can click on any of the breadcrumbs to be taken to that task's page.
Task details
Next, the task title is shown in a heading bar. This is followed by a series of information 'pills' that show you key information about the task, such as its creation date, deadline, priority and shared status.
Action buttons
Beneath the information pills you will see a series of action buttons:
- Up - takes you to the parent task
- Search - search for a task across all of your tasks
- Edit - edit the task
- Copy - copy the task (and its subtasks) to another task
- Move - move the task (and its subtasks) to another task
- Repeat - set the task to repeat at a specific interval
- Notes - add notes to the task
- AI - use AI to break down the current task
Subtasks
Beneath the action buttons is the subtasks section.
It has a heading bar which contains:
- Task summary - shows and hides detailed counts by filterable category
- Multi mode - enables or disables multi mode which allows you to perform actions on multiple subtasks at once
- Expand/collapse - expands or collapses all subtasks to show you each of their subtasks in a preview on the current page
- Task details - toggle between showing or hiding the task info pills for each subtask (e.g. deadline, priority, shared etc)
- Filters - buttons (via a drop down on mobile) that let you filter and sort by title, deadline, time, status, priority, and archived state
Beneath the heading bar is a table where each row represents a subtask of the current task.
Task status icons
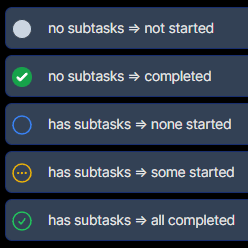
When you initially add a task, there will be a checkbox which you can toggle to set the status of that task. Once you add a subtask to a task, the parent`s status becomes determined by the aggregated status of its subtasks:
- An empty blue circle indicates no substasks have been started yet
- An orange circle with an ellipsis indicates some subtasks have been started or completed but not all
- A green circle with a checkmark indicates all subtasks have been completed.
Pagination
If there are more than 10 subtasks, pagination controls will be shown at the bottom of the subtasks table. You can use these to navigate between pages of subtasks.
You can also use the keyboard to navigate between pages of subtasks. Press the "[" and "]" keys to navigate between pages, hold shift to navigate to the first and last pages.
You can also change the number of subtasks shown per page by clicking the drop down and selecting a number. Alternatively press the "r" key to cycle between the available options.
You can set a default number of subtasks to be used across sessions in General Settings.
Add task input
At the bottom of the page is an input field that allows you to add a task to the current page.
See the managing tasks page for more information on adding tasks.
Navigation
Navigating between tasks
Click on a task to be taken to that task's page.
You can also use the keyboard to get around (provided your cursor isn’t in an input field). Press the up and down arrow keys to select a task. Press right to go to the selected task’s page.
Returning to the parent task
Click the up icon or press the left arrow key provided you aren’t editing a task.
You can also navigate directly to any of the tasks parents by clicking on the breadcrumbs at the top of the page.
Returning to your top level tasks
Click the dypt logo, home icon, or press the "h" key, provided you aren’t editing a task.
Searching for tasks
Click the search button just beneath the header or press the "f" key to start searching. You can search by title or task id. To stop searching, click elsewhere or press ESC.